
Quand j’ai découvert le tutoriel de cet essuie-mains dans le Prima du mois d’Août j’ai tout de suite eu envie de me remettre au point de croix ;-) En plus comme je vous l’écrivais dans mon article de mardi la broderie est loin d’être has been. Ni une ni deux, j’ai acheté tous le matériel nécessaire pour m’y mettre et j’ai réalisé cet essuie-main tête de mort de plus bel effet dans ma cuisine, non ?
When I discovered this tutoriel in Prima magazine I couldn’t resist to go back to stitching ;-) Morever as I was telling you in my article of tuesday stitching is really in. So I bought all the material and I realized this skull stitched hand towel for my kitchen. Do you like it ?
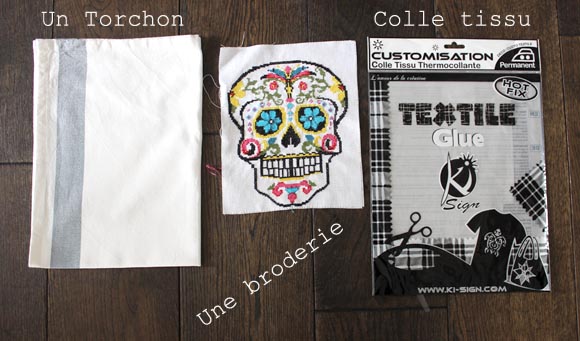
Pour réaliser un essuie-mains brodé tête-de-mort il vous faut :
-Broder votre tête de mort. Vous pouvez télécharger la grille gratuitement sur le site de Prima ici
-Un essuie-mains
-De la colle tissu thermocollante
-Un fer à repasser
-Du fil, une aiguille
To realize this skull stitched hand-towel you need :
-To stitch the skull. You can download the pattern for free here ici
-A hand-towel
-Hot fix fabric glue
-Iron
-Needle and thread
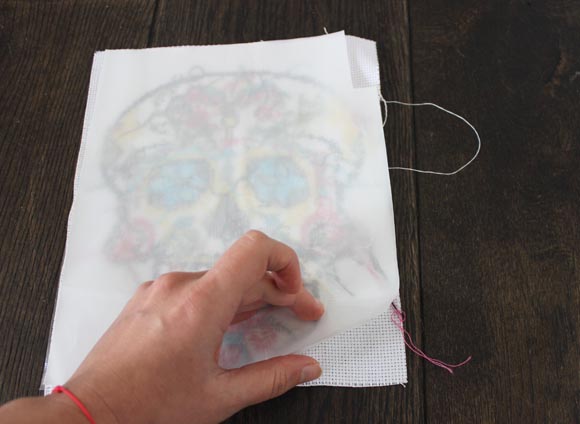
Une fois votre broderie réalisée (je tiens à vous prévenir que ça m’a pris quelques longues heures ….) placez la feuille de colle tissu thermocollante sur l’envers du travail.
Once you have realized the stitching (I have to warn you it take me some long hours to make it…) place the hot fix textile glue at the back of your work.
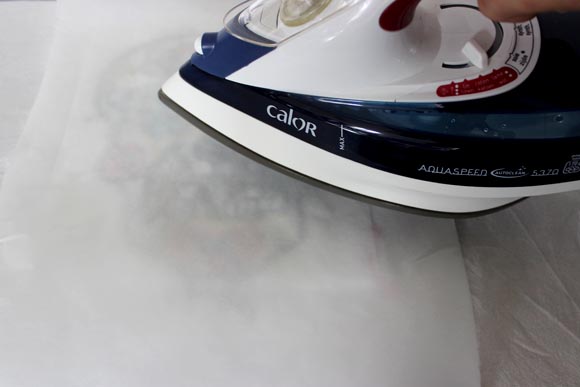
Repassez selon les précautions du fabricant.
Iron-it. 
Découpez l’excédent de toile aïda.
Cut the excess of canvas. 
Pour que le travail soit propre, réalisez un ourlet que vous allez ensuite repasser.
So the work is clean, realize an hem that you will then iron.

Attention cette opération est délicate car le dos de votre broderie est entoilé avec le thermocollant. Pour être sûr de ne pas vous retrouver avec de la colle partout mettez une feuille de papier cuisson et repassez l’ourlet en restant bien sur l’extérieur du travail.
Warning this step is hard because the back of your stitching has hot fix textil glue. So to avoid having glue everywhere put a baking paper and iron the hem staying at the outside of the work.

Voila le résultat une fois votre ourlet marqué.
Here is the result once the hem is done.


Ensuite placez votre broderie sur l’essuie-mains et repassez en plaçant une protection (patte-mouille ou papier cuisson) entre le fer et le devant du travail.
Then place your stitching on the hand-towel and iron by placing a protection (baking paper or fabric) between the iron and the front of the work. 
Pour être sûr que le tout tienne bien, cousez à points invisibles la broderie au torchon. J’ai utilisé un dé car les multiples épaisseurs rendaient le travail difficile.
To make sure everything is beeing solid, sew the stitching to the hand-towel. I use a thimble because the several thickness make the work hard.

Et voila un torchon bien tendance pour ma cuisine et mon évier Grohe ! ça m’a vraiment donné très envie de réaliser d’autres broderies. Alors attendez-vous à en voir sur le blog très prochainement !
And here you are ! I really want to stitch again. So be aware that you are going to see more on the blog soon.



Pingback: Explore Your Dark Side – How To Decorate With Skulls - Proverbial31
Pingback: Explore Your Dark Side – How To Decorate With Skulls | Club Oferteproprietari.ro